Saturday, 11 April 2020

How to block screen on Lightning Component on Loading

Hi,

Here I would like to discuss a way of blocking screen on a lightning component while loading or clicking on a button.

Here is code.

Lightning Component

<aura:component implements="force:lightningQuickAction" >

    <aura:handler event="aura:waiting" action="{!c.showSpinner}"/>
    <aura:handler event="aura:doneWaiting" action="{!c.hideSpinner}"/>
</aura:component>

JS Controller:

({

    // function automatic called by aura:waiting event 
    showSpinner: function(component, event, helper) {
        // remove slds-hide class from mySpinner
        var spinner = component.find("mySpinner");
        $A.util.removeClass(spinner, "slds-hide");
    },
   
    // function automatic called by aura:doneWaiting event
    hideSpinner : function(component,event,helper){
        // add slds-hide class from mySpinner   
        var spinner = component.find("mySpinner");
        $A.util.addClass(spinner, "slds-hide");
    }
})

Thursday, 23 March 2017

How to deal with Action function & Apex Command Button Together

I have seen many posts where I found newbies are struggling with issues when they call action function from apex:command button. 

I have some points to be considered: 
1. My first recommendation is to avoid calling action function from apex Command Button until unless you have specific requirement to validate some inputs in javascript before hitting the server. 

2. If you have to call action function from command button then please follow below points. 
     2.A) When you use action function and command button then you page gets submitted two times and it causes an issue of setting public properties (bound with Page like setters) to null value. 
     2.B) To resolve this issue use  "return false;" in your onclick event just after calling JS function or action function. 
    2.C) Please go through with below code to see how to do it. 

<apex:page Controller="myController">
<apex:form>
<apex:actionFunction action="{!SaveData}" name="SaveData" reRender="pbId" />
<script>
function Save() {                
SaveData();                                      
}
</script>
<apex:pageBlock id="pbId" >
<apex:commandButton value="Submit" onclick="Save(); return false;" rerender="pbId" />
</apex:form>
</apex:page>

How to check if at least one check box is selected in Apex Page BlockTable

Hi folks,

I would like to touch a very common scenario we had to check if at least item (from checkbox) is selected from a data table before submitting the form.

I have implemented it as below:

<apex:page Controller="myController">
<apex:includeScript value="{!URLFOR($Resource.jsFiles, 'jquery-1.7.1.min.js')}" />
<apex:includeScript value="{!URLFOR($Resource.JQueryUI, 'jquery-ui-1.11.2/jquery-ui.min.js')}"></apex:includeScript>
<script>
j$ = jQuery.noConflict();
function Save() {
                if(j$(".selectionCheckbox:checked").length == 0){
                          alert('Please select at least one Item.');
                       }
                       else {
                        // Call action function to go ahead to save
                       }                
                }
</script>
<apex:pageBlock id="pbId" >
<apex:pageBlockTable value="{!SampleDataList}" var="RelatedData">
<apex:column >
<apex:facet name="header">
<apex:inputCheckbox id="checkAll"
onClick="jQuery('.selectionCheckbox').attr('checked', this.checked);" />
</apex:facet>
<apex:inputCheckbox styleClass="selectionCheckbox"
id="myCheckbox" value="{!RelatedData.isSelected}" />
</apex:column>
<apex:column value="{!RelatedData.Name}" />
</apex:pageBlockTable>
<apex:commandButton value="Save" onclick="Save(); return false;"
rerender="pbId" />
</apex:page>

Thursday, 5 January 2017

Insufficient Error while Editing/Deleting Task in Salesforce

Recently I came across with an issue of getting in sufficient error (while editing or deleting task) by logged in user where he has created task and assigned to any other user without associating with any record. 

I found some facts during my research. I found that :  

If a user 'A' creates a task record and assign it to user 'B' then this task would not be visible to user 'A' until unless task is related to a record which is accessible to user 'A'. 

But even user 'A' can see that task through a way I just explained above, user 'A' would not be able to Edit or Delete that task record. 

So we may consider that through standard Interface ( standard layout/Home Page 'My Task' section or any report) it is not possible but I found that by accessing task records through Visualforce page we allow user 'A' to edit as well as delete task record created by him.

Saturday, 24 December 2016

Switching to Lightning in Easy Way...


Hey folks,

Since last so many years I am living with one of the best UI framework that is Visualforce. It is such an amazing part of salesforce which helps a lot for interacting, an end user with application.

Time by time, as we are switching to mobile devices which are so handy as well as supportive to our life style for providing all the information on the go. A series of technologies are being used for displaying information quick & in responsive manner according to device your are with, regardless of size.

In order to show information in responsive way, we need many technologies. So along with developing logic we need to take care of responsiveness too.

"How easy it would be if it responsiveness gets handled automatically without require an extra efforts. Is there any solution available in salesforce ?"

Yes Lightning is here !!

Lightning component take care of it and let you focus only on developing business logic.

So if you are still on visualforce then here are some tips to understand how to move to lightning.

  1. Lightning component is based on Aura (an open source UI framework) that supports HTML tags also and can be easily bind with apex controller.
  2. You may get started building lightning component through developer console it self.
  3. Lightning component may overcome many problems that you face in visualforce. For example we can not show more than 1000 items in visualforce page directly binding collection to VF page but lightning component allows it.
  4. Using lightning component, you may keep your application structured that is very easy to maintain.
  5. As visualforce are page-centric, meaning we have to do most of the things on server side but lightning component are based on client-side-centric so before switching to lightning, this should be considered as per your requirement.

Here is one of my Blog post regarding how to develop lightning component.
Go #Lightning!!

Friday, 12 August 2016

How to Combine Documents through Docusign APIs

This time I got a chance to play with inner world of Docusign. Always I prefer REST API but this time SOAP saved my life.

I had a challenge to combine all signed document in single enevelope ( condition is you can not get it through Docusign configs settings because that is common for) so I have used soap api this time over rest ( was giving me Time out error).

Required Data:  Docusign Credential , Integrator Key & EnevelopId.

Firstly created a class 'DocusignSOAPfromWSDL_Cls' trough wsdl file then written our logic to get all document in combined format. Below is my code snippet:


// To Set endpoit URL
dsApiSend.endpoint_x = 'https://demo.docusign.net/api/3.0/dsapi.asmx';

// To Set Authentication
String auth = '<DocuSignCredentials>
                                <Username>'+ DocusignUserName+'</Username>
                                <Password>' + DocusignPassword + '</Password>
                                <IntegratorKey>' + Docusign_IntegratorKey + '</IntegratorKey>                                                 </DocuSignCredentials>';

// To Set Headers        
dsApiSend.inputHttpHeaders_x = new Map<String, String>();
dsApiSend.inputHttpHeaders_x.put('X-DocuSign-Authentication',auth);      

//Interating all incoming docusign status records
 DocusignSOAPfromWSDL_Cls.EnvelopePDF combinedPDF = dsApiSend.RequestPDFNoWaterMark(docusignEnvelopeID);
       Attachment combinedDocument =  new attachment(
                                           Body=EncodingUtil.base64Decode(combinedPDF.PDFBytes),
                                           Name= AttachmentName+'.pdf',
                                           parentId= ParentRecordId
                                    );
      insert combinedDocument ;

This is how you may combine all signed document through Docusign.


Thursday, 4 August 2016

Finding nearest locations on google map within Salesforce

Locating anything is just part of our daily habit. Salesforce made is very easy by adding Geolocation to Address field types. So I have did one practice to locate nearest restaurants on google map.

Lets Say I have one Company Record and would l like to plot all restaurants that are located in x unit of distance to company on google map.

To achieve this I am going to use two features of salesforce one is Distance formula

DISTANCE(AddressField, GEOLOCATION(latitude,longitude), 'mi')

and another one is apex:map & apex:mapmarker tag

Visualforce page:

<apex:page controller="findrestaurantsController">  
      <apex:pageBlock >
         <apex:pageBlockSection title="Nearest Restaurants" >      
            <apex:map width="600px" height="500px" center="{!mylocation}" zoomLevel="5">
                <apex:repeat value="{!NearestRestaurantsList}" var="nearestPos" >
                    <apex:mapMarker position="{!nearestPos.location}" title="{!nearestPos.RestaurantName}"/>
                </apex:repeat>
            </apex:map>          
         </apex:pageBlockSection>
    </apex:pageBlock>
</apex:page>

Controller:
public class FindrestaurantsController {

  // Public Properties
  Public map < String, decimal > mylocation {
    get;
    private set;
  }
  Public List < NearestRestaurants > NearestRestaurantsList {
    get;
    set;
  }

  Public FindrestaurantsController() {
    Company__c Company = new Company__c();
String CompanyId = ApexPages.currentPage().getParameters().get('id');
    Company = [Select Id, Name, Location__latitude__s, Location__longitude__s From Company__c Where Id =: CompanyId];

    mylocation = new Map < String, Double > {
      'latitude' => Company.Location__latitude__s,
      'longitude' => Company.Location__longitude__s
    };

    String queryString =
      'SELECT Id, Name, Radius__c, Location__c, Location__longitude__s,' +
      'Location__latitude__s ' +
      'FROM Restaurant__c ' +
      'WHERE Id != \'' + Company.id + '\' AND DISTANCE(Location__c, GEOLOCATION(' + Company.Location__latitude__s +
      ',' + Company.Location__longitude__s + '), \'mi\') < ' +
      Company.Distance__c + ' ' +
      'ORDER BY DISTANCE(Location__c, GEOLOCATION(' + Company.Location__latitude__s + ',' + Company.Location__longitude__s +
      '), \'mi\') ';

// Getting nearest Restaurant records
    List < Restaurant > otherRestaurants = new List < Restaurant > ();
    otherRestaurants = Database.query(queryString);

    NearestRestaurantsList = new List < NearestRestaurants > ();
// Building wrapper List
    for (Restaurant otherRestaurant: otherRestaurants) {
NearestRestaurants wrapItem = new NearestRestaurants(
                             new Map < String, Double > {
                                    'latitude' => otherRestaurant.Location__latitude__s,
                                       'longitude' => otherRestaurant.Location__longitude__s              },
                                       otherRestaurant.Name);

NearestRestaurantsList.add(wrapItem);
    }

  }

  // Wrapper Class to store nearest restaurants detail
  Public Class NearestRestaurants {
    Public map < String, decimal > location {
      get;
      private set;
    }
    Public String RestaurantName {
      get;
      private set;
    }
    public NearestRestaurants(Map < String, Double > nearestlocation, String myResName) {
      location = nearestlocation;
      RestaurantName = myResName;
    }
  }
}

Thanks for reading this post. 

Tuesday, 5 July 2016

Salesforce disabling TLS 1.0 Solution


As we all know Salesforce disabled TLS 1.0 so any inbound connections to or outbound connections from your Salesforce org will need to use the TLS 1.1 or TLS 1.2 encryption protocol

So if have been going through below issue (like me)

Why do I see the error: TLS 1.0 has been disabled in this organization. Please use TLS 1.1 or higher when connecting to Salesforce using https

& if you are in Summer'16 then Here is the solution for 

1. Eclipse: 
In your eclipse folder, there should be eclipse.ini file Please open file and add below 
keyword
-Dhttps.protocols=TLSv1.1,TLSv1.2


2. Migration Tool Like ANT: 

Add below variable in environment variables. 
Variable Name : ANT_OPTS  
Variable value  : -Dhttps.protocols=TLSv1.1,TLSv1.2

Sunday, 19 June 2016

How to handle a 301 redirect response to my HTTP callout

While trying out https callounts we typically see response with Status=Moved Permanently, StatusCode=301. Below is the code sample which gives us error:
Http h = new Http();
HttpRequest req = new HttpRequest();
     
req.setHeader('Authorization', 'bearer ' + 'xxxxxxxxxx');
req.setEndpoint('https://www..com/v1.2/accounts');        
req.setMethod('GET');
req.setHeader('Content-Type', 'application/json; charset=UTF-8');
req.setTimeout(60*1000);
HttpResponse res = h.send(req);
String resString = res.getBody();
This errors generally occurs when target point we hit for, has permanently moved to a new location so in this case response should include this location. to fix this error we just need to get location out of first response and hit it again.So Finally code should be like below:

Http h = new Http();
HttpRequest req = new HttpRequest();
       
req.setHeader('Authorization', 'bearer ' + 'xxxxxxxxxx');
req.setEndpoint('https://www..com/v1.2/accounts');        
req.setMethod('GET');
req.setHeader('Content-Type', 'application/json; charset=UTF-8');
req.setTimeout(60*1000);
HttpResponse res = h.send(req);
String resString = res.getBody();
String loc = res.getHeader('Location'); // get location of the redirect
req = new HttpRequest();
req.setEndpoint(loc);
req.setMethod('GET');
req.setHeader('Authorization', 'bearer ' + 'xxxxxxxxxx');
        res = h.send(req);

Now it gives Status code 200 with Status "OK"

Tuesday, 15 March 2016

Delete Components before and after Component Updates in a deployment in Salesforce

Guys, As we all know that Ant is such a great migration tool. I have described how we can set-up ANT on our local machine and migrate desired component to Salesforce org.

Today I am going to describe how we can delete component from salesforce org using ANT. Salesforce has provided a way of achieving it through some well defined desctructiveChanges.xml .

Later on, it would took two at least migration attempts for clearing-up dependencies between components and deleting those respectively.
For example if one custom field is being used by an apex class then we can not delete that field until we remove that field's active presence from apex class. For this purpose, Salesforce unveiled two new type of xmls

1. destructiveChangesPre.xml
2. destructiveChangesPost.xml

Lets understand with an example. Let say there are two fields amount__c,department__c on Account Object and there is one class ShowingResult that use one field amount__c.
Public class ShowingResult {

   Public void ShowingResult()
   {
       Account acc = new Account{Name = 'testAcc', amount__c = 1232};
       insert acc;    
   }

}

In order to delete these two fields we need to make some required changes in apex class first. then system would allow us to delete amount__c field. Generally it would take two steps but the way is described below would do our job in one attempt.

Here is your modified Apex Class:
Public class ShowingResult {

   Public void ShowingResult()
   {
       Account acc = new Account{Name = 'testAcc'}; // with modification
       insert acc;    
   }

}

Now we just need to create three xml files(as below) and run these.System would run desctructiveChangesPre.xml then package.xml for updating component where we have removed dependencies. finally it would run desctructiveChangesPost.xml.
Your desctructiveChangesPre.xml

    
        Account.department__c
        CustomField
    
    36.0

Your Package.xml:

    
        ShowingResult
        ApexClass
    
    36.0

Your desctructiveChangesPost.xml:

    
        Account.amount__c
        CustomField
    
    36.0

Keep these xml in src folder and run migration.

Saturday, 27 February 2016

SandboxPostCopy : featured Post Refresh Activity

Hi Folks,

Today I am going to discuss about a very beautiful features Salesforce just released. This features to make your sandbox environment business ready, automate data manipulation or business logic tasks.

While creating/refreshing any sandbox from you may need to run any logic just after completion of refresh so now it is possible using this feature called "SandboxPostCopy" interface.

Here I am taking an example where I need to create some couple of records of an opportunity object just after completing with refresh activity.

I should have a class in production as below


global class createOpportunity implements SandboxPostCopy {
  global void runApexClass(SandboxContext context) {
        // write your logic to create opportunity
     }
  }

then while refreshing/creating sandbox you need to select this class to be executed as below:


Thanks for reading.!!


Friday, 19 February 2016

Trailhead Trail: Navigate the Salesforce Advantage

Salesforce never sleeps ..

As we all know Salesforce brings new and exciting things for us day to day & specially through Trailhead.

This time Salesforce launched a new trail which let us know about many key differentiators , core values & vibrant ecosystem in very simple way as it alwasy does.

Here is the path :  Navigate the Salesforce Advantage

It designed so beautiful that you will learn a lot along with fun story. It is 80 mins ( ideally ) trail. where you will know :

Salesforce Success Model  | Salesforce Cloud Benefits | Salesforce Technology Basics | Salesforce Ecosystem

It is useful for all who are already familiar Salesforce but specially who are newbie.

Let me bring my views over every Module of this trail:
Salesforce Success Model

It introduces Salesforce to you in a different way and very beneficial if you would like to grow as company as fast as you can.


It explains beautifully that salesforce is a complete CRM and how it would become more beneficial as it is available on cloud. There are ample benefits of having cloud platform rather than traditional systems. How salesforce cloud gives us more advantage.


When it talks about basics it brings many thing which essential to know like how Salesforce care about trust of customers, How system provides multitenancy to use system more efficiently/productively. 
How we can understand technical concept though real life examples which is such a great way to learning. e.g. metadata. 
also explains how user can decide if app should be developed by either point & click or coding.

it gives a message that we all are together, we can make progress helping to each other thats why community was built. Appexchange was introduced, local user group events are being organized.

So event I have been associated with salesforce since last many years but still many new things while doing this trail.

What I feel: 
  • This trail really helpful to dev, admin to understand salesforce from in a new way and related with what experience they are getting over the years working on salesforce platform.
  • I would love one of four core differentiators that is customer success. It really matter like if your custom is happy and getting success it feels you happy and more confident while delivering more and more. 
  • So I have done this trail !! what you are waiting for ??  Thanks Salesforce Trailhead for giving such innovative ways of learning. 
Thanks everyone for reading the post.


Wednesday, 23 December 2015

Advanced Formulas by Salesforce Trainhead

As we all know formulas are very power tool which let you know calculation result very quick without single line of apex code. It saves a lot of time and avoid apex customization and all. 

Salesforce recently added a great explanation over advance formula in to Trailhead just to let us learn more and more about formula's concept. 
I have gone through with deep dive and I liked the way of explanation as I always see on trailhead no matter if you are newbie/intermediate/Specialist. 

On this trail it explains Advance formula with different return types:
Checkbox, Number, Percetage, Currency,Date/DateTime etc. 

Also covering how to use Text & picklist field values in formula.

Let me cover a these in bit more detail.
1. It explains how checkbox plays important role in to formulas & how we can use IF(), AND(), NOT(), and OR() functions in these formulas. Just to play with it click here
Using Basic Logic in Checkbox Formulas
2. It explains the difference between the number, currency, and percent types & also describe use cases for formulas with the number, currency, and percent types.Just to play with it click here
Using Numbers, Currency, and Percentages in Formulas
3. explanation to build and avoid confusion between usage of Date and DateTime formulas.Just to play with it click here
Using Date and Date/Time Formulas
4. Also explains how to refer picklist field in formulas & some use cases for formulas that reference picklist fields.Just to play with it click here
Using Picklists in Formulas
5. and at last it covers about text type formulas.Just to play with it click here
Using Text Formulas

Tuesday, 15 September 2015

New Lightning Experience Content over Traihead

Salesforce always brings new things but this time it brought amazing, fabulous thing for all of us no matter if we are Developers, Admins, Salesforce Rep.

"Salesforce brought-up a new Salesforce." it is nothing but new Lighting experience along with supporting classic one.

And also provided a great tool for getting started with it in easiest way. As I am developer so would like to bring you deep in new lightning dive.

Developer Trail - Lightning Experience | Salesforce Trailhead

So come with me visit few of my favorite content putting over there.

Lightning Experience Basics

To respond millions of feedback Salesforce bring some thing new which can
1. Fill gap between Dev, Admin & Sales Rep.
2. Save precious time of customer to do any activity in minimum clicks.
3. Help develop, access Apps compatible for different devices whether it is Desktop, Mobile or Tablae.

So Salesforce introduced new Lighting Experience. It faster, beautiful & more interactive. It is very easy to switch to or back to previous one based on user's preference.

Best feature I liked most is that Salesforce has given all control to end user for  getting new look & feel (experience) of doing things quickly just like light flash that's why it was called Lightning Experience.

in this series I have another content I would love most is

Using Visualforce in Lightning Experience

After getting a basic idea now next thing is to customization do lets go to development corner. Although we are moving ahead to new lightning experience but salesforce continue to support existing Visualforce development for Salesforce classic (existing Salesforce) as well as allowng visualforce development in new lightning experience.
Here are few steps like
build VF page-> Create Tab for it -> custom App and make it available in App Launcher.

A smplified way to test your page in Lightning Experience is just type the following into your JavaScript console as below:


$A.get("e.force:navigateToURL").setParams({"url": "/apex/pageName"}).fire();


now question raised that will Existing VF page will also work on new Lightning experience  then answer would yes but not fully as we need to make some required changes to do this.

so for more information you can quickly visit :https://developer.salesforce.com/trailhead/trail/lex_dev


Friday, 4 September 2015

JSON Data Binding in Apex

While playing with JSON I came up with intersting usecase of binding JSON data in Class properties.

Here is JSON Data:
[ 
 {
  "ProductionHouse":"ABCD", 
  "Director":"Mr XYZ", 
  "Casting": [
   { "Title": "Play1", 
   "Artists": ["Artist1", "Artist2", "Artist3", "Artist4", "Artist0"]   
   },    
   {
   "Title": "Play2",
   "Artists": ["Artist1", "Artist2", "Artist0"] 
   }
  ]
 }
]
in order to coupling this data with some real time properties I have written below logic :
 Public Class Play_Controller{

    // JSON data binding with Class properties 
    public static void Databinding()
    {
        String inputJSON= '[    {   "ProductionHouse":"ABCD","Director":"Mr XYZ","Casting": [{ "Title": "Play1","Artists": ["Artist1", "Artist2", "Artist3", "Artist4", "Artist0"]             },  {"Title": "Play2","Artists": ["Artist1", "Artist2", "Artist0"] }]}]';
        List DataMainwrapperList = new List();
        DataMainwrapperList = (List< DataMainwrapper >)JSON.deserialize(inputJSON, List.class);

        for(DataMainwrapper Obj : DataMainwrapperList)
        {
            system.debug('---Prod House Name--'+Obj.ProductionHouse);
            system.debug('---Director--'+Obj.Director);
            for(CastingSubWrapper subobj : obj.Casting)
            {
                system.debug('---Play Title--'+subobj.Title);
                system.debug('---Play Artists--'+subobj.Artists);
            }
        }
    }
    
    // Wrapper holding properties of JSON with data upper leve
    public class DataMainwrapper{
        String ProductionHouse;
        String Director;
        List Casting;
    }

    // Wrapper holding properties of JSON with data sub level
    Public class CastingSubWrapper{
        String Title;
        List Artists;
    }    
}
//--Please Ignore below code line--
Further we can bind this data in respective objects in Apex. So I hope now it will helpful to understand how JSON data may enter in salesforce.

Thursday, 27 August 2015

Meet the New Salesforce

Hi, All Customer, Developers, Admins.

It doesn't matter you do code or not but the thing today I am talking about, is for you. It is new Salesforce in form of experiencing new design.


After Trailhead announcement Salesforce made a biggest announcement in their release. It is bringing a new face of Salesforce to us. Now Salesforce letting customers design their screen.


There are key notes behind this new change:

Customer Adoption:
After hearing many useful feedbacks Salesforce implemented this new design in such a way that it is easy, fast & successful for all customers for easy to adopt.

Easy Switching :
Now Salesforce unveiled this in new face of CRM package which is completely redesigned version. It is new kind of interface, Salesforce built which will let us feel something new over the existing layer but will keep supporting existing UI(classic version) so that we can easily switch in between both versions.

Design System:
Through lightning salesforce made process more faster using drag & drop concept to configure new design which clearly reflect clarity in idea,efficiency, consistency & beauty in it.

Scope:
It is just a starting with building CRM package over lightning and in future many more things are lined-up with new version.

Browser Support:
New version would be supportive on all browsers like IE 11, Safari version 8, most recent stable version of firefox & chrome. while using lower version of IE it will automatically switch to classic version.

When it will be available?
It would be in our orgs in next Winter Release but it might be available on some pre release orgs for early access. There is a way to complete some lightning trails in order to be on priority for getting early access releases.

For more detail watch the complete session here : Meet the New Salesforce Live from San francisco

Wednesday, 19 August 2015

Salesforce integration with Salesforce

Accessing Apis of external system is call integration in simple words. Here I will talk about how salesforce org gets integrated with another salesforce org.
Going forward I would call these two Salesforce orgs as Source org & Target org.

Requirement: Requirement is to fetch user information from target org in to source org.

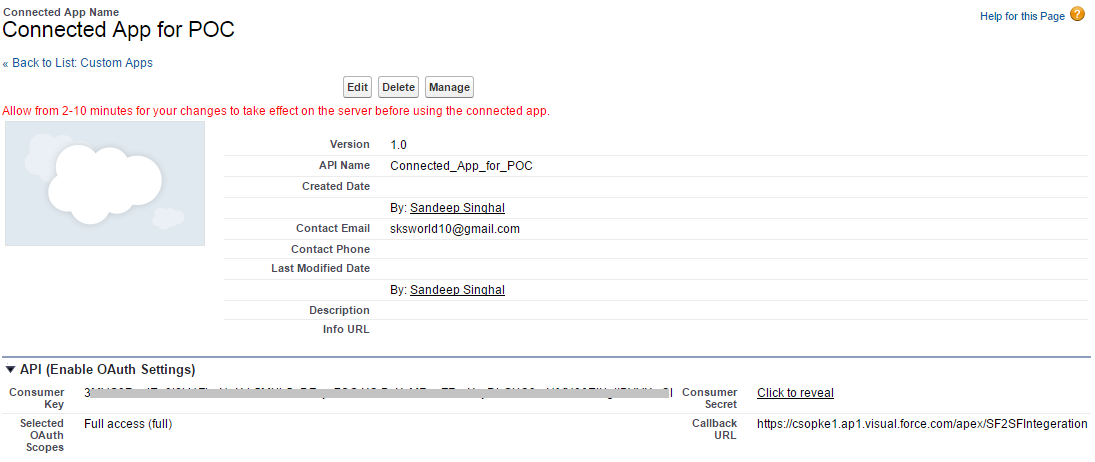
Step1. It is the master key point that always you have to build an App in Target Org so now you need to create a connected App.
Once you have created Connected App then you get two important keys :
1. Client ID
2. Client Secret

These are common keys which you get while creating connected Apps.

Step2. Now you need to write a VF page and Apex class.
VF page


Apex Class
Note: Here you have to use client id, client secret & redirection URI in below class:

public class SF2SFIntegerationcontroller {

    string code;
public Pagereference SF2SFIntegerationClassMethod()
{   
    String clientId ='xxxxxx';// 
    String clientSecret = 'YYYYY';    
    String redirecurl = EncodingUtil.urlEncode('https://csopke1.ap1.visual.force.com/apex/SF2SFIntegeration','UTF-8.');
    
    if (ApexPages.currentPage().getParameters().containsKey('code') && ApexPages.currentPage().getParameters().containsKey('code') != null) 
    {
        code = ApexPages.currentPage().getParameters().get('code');
        String oauthURlText = 'https://test.salesforce.com/services/oauth2/token?grant_type=authorization_code&client_id='+clientId+'&client_secret='+clientSecret+'&redirect_uri='+redirecurl+'&code='+code;
        Http h = new Http();
        HttpRequest req = new HttpRequest();
        req.setEndpoint(oauthURlText);
        req.setMethod('POST');
        req.setTimeout(60*1000);
        HttpResponse res = h.send(req);
        String resString = res.getBody();
        OAuth2 objAuthenticationInfo = (OAuth2)JSON.deserialize(res.getbody(), OAuth2.class);
                
        //USAGE
        HttpRequest req1 = new HttpRequest();
        req1.setHeader('Authorization', 'Bearer '+objAuthenticationInfo.access_token);
        req1.setEndpoint(objAuthenticationInfo.instance_url+'/services/data/v29.0/query/?q=SELECT+id,+name+FROM+user+limit+1');
        req1.setMethod('GET');
        req1.setTimeout(60*1000);
        HttpResponse res1 = h.send(req1);
        String resStringfromExternalOrg = res1.getBody();
        system.debug('------'+resStringfromExternalOrg);
        return null;
    }
    else
    {   PageReference pgRef = new PageReference('https://test.salesforce.com/services/oauth2/authorize?response_type=code&client_id='+clientId+'&redirect_uri='+redirecurl);
        return pgRef;
    }
    
  }
    /*To get aouthentication detail Wrapper*/
    public class OAuth2{
    
     public String id{get;set;}
     public String issued_at{get;set;}
     public String instance_url{get;set;}
     public String signature{get;set;}
     public String access_token{get;set;}    
    }

}
 

Step3: Now you just need to execute VF page. You might need to setup remote site setting for URIs, you are hitting while executing Page. If any mediator screen asks to allow permission just allow it (to avoid it you need to use target org's credential in your logic) and see the magic in your debug log.

as these two orgs integrated so now You will get user information from target org in to source org.

Salesforce Meetup for Students March 2015

So... It was again a great opportunity for us to organize Salesforce meetup specially for students. many old faces continued and many new started with Salesforce platform.
I would like to express my great thanks to April Nassi and Ankit Arora to support me in my this new sort of initiative.
Now coming to Meeting Notes:

In Last Meetup I discussed about Basic Salesforce as a cloud computing platform so in continuation
Deepak Kumar Shyoran brought-up many important key points we should start with in Salesforce. He related 
Salesforce features with real time events. He explained every point with in such a nice way that Students
could not feel the gap of their current knowledge levels. 

It was not all about theoretical session but we moved further keeping people tuned-up
by asking questions with a new trivia series and distributed very very cool stuff. 

Moving ahead to next level I brought-up Salesforce1 in the discussion box. I tried my best to explain how 
Salesforce came in picture along with Salesforce. What was the need and how it is getting accomplished. 
I covered-up Salesforce1 basics.

but as we know untill unless we see some thing going live in front of us we could not capture it at all so 

Ashwani Soni demonstrated how we can switch to Salesforce 1 by performing very simple steps in 
Salesforce.

So would like to express great thanks to SKIT and all students who joined. 

with regards...
sp

Thursday, 6 August 2015

Lightning Component

After Lighting connect one of previous blog now I would like to share some thoughts on lightning component. So what is lightning component?
"The Lightning Component framework is a UI framework for developing dynamic web apps for mobile and desktop devices".

Salesforce has provided us Lightning App Builder to build lighting different Apps using components. The Lightning Component framework is built on the open-source Aura framework available at http://github.com/forcedotcom/aura.

So let me come to the practical example:
There are simple steps to build any lighting components:
Step1: You Name> Developer Console > File > New > Lightning Component. Here Provide Name of Component and click on Submit button.

Step2: For developing lightning component we need to understand below parts mainly as lightning bundle.

a) component
b) controller
c) Helper
d) Style

A component contains the UI part aura tags are being used along with other html tags and it is tightly coupled with Apex controller but here the interesting thing to understand is properties of component are not directly bounded with apex controller while there are two extra layers controller and helper which pays as middle layer. while Style plays role of providing CSS features.

Here I have built lighting application

Component :
 <aura:component access="global" controller="ShowRecordClass" implements="flexipage:availableForAllPageTypes">
 <aura:attribute name="myAccounts" type="Sobject[]">
    <aura:handler action="{!c.getAccRecords}" default="Account" name="init" value="{!this}">
    <aura:attribute name="ObjectApiName" type="String">
    <aura:attribute name="ObjectLabel" type="String">
    <aura:attribute default="5" name="maximum_NoOfRecordstofetch" required="true" type="integer">
    <aura:handler action="{!c.getobjectLabel}" name="init" value="{!this}">
    Here are {!v.maximum_NoOfRecordstofetch}(or less) most recent created Records for Object : {!v.ObjectLabel}
    </aura:handler></aura:attribute></aura:attribute></aura:attribute></aura:handler></aura:attribute></aura:component><br />
<div class="RecordTable">
<div>
<aura:iteration items="{!v.myAccounts}" var="obj">
                        </aura:iteration><br />
<table class="imagetable">
                   <tbody>
<tr>
                       <th class="thcls">{!v.ObjectLabel} Id
                       </th>
                       <th class="thcls">{!v.ObjectLabel} Name
                       </th>
                   </tr>
<tr>
                         <td class="tdcls"><ui:outputtext value="{!obj.Id}"></ui:outputtext></td>
                            <td class="tdcls"><ui:outputtext value="{!obj.Name}"></ui:outputtext></td>                                                      
                        </tr>
</tbody></table>
</div>
</div>

Controller:
({
 getAccRecords : function(component, event, helper) {
  helper.fetchrecords(component);
 },
    getobjectLabel : function(component, event, helper) {
  helper.fetchobjectLabel(component);
 }
})
Helper
({
    fetchobjectLabel : function(component) {
  var action = component.get("c.returnObjectLabel");
         action.setParams({
         sobjeApi : component.get("v.ObjectApiName")            
      });
            action.setCallback(this, function(response) {
            var state = response.getState();
            if (state === 'SUCCESS') {
            component.set("v.ObjectLabel", response.getReturnValue());                
            }
            });
            $A.enqueueAction(action);
 },
 fetchrecords : function(component) {
  var action = component.get("c.fetchRecord");
         action.setParams({
         sobjeApi : component.get("v.ObjectApiName"),
            numberofRecords : component.get("v.maximum_NoOfRecordstofetch")
      });
            action.setCallback(this, function(response) {
            var state = response.getState();
            if (state === 'SUCCESS') {
                console.log('=**=');
            component.set("v.myAccounts", response.getReturnValue());      
            }
            });
            $A.enqueueAction(action);
 }
    
})
Apex Controller
Public Class ShowRecordClass{

@AuraEnabled
Public Static List fetchRecord(String sobjeApi, Integer numberofRecords)
{
    List LstOfAcc = new List();
    LstOfAcc  = Database.query('select id, Name from '+sobjeApi+' Order by CreatedDate DESC limit '+numberofRecords);
    return LstOfAcc  ;
}
@AuraEnabled
Public Static String returnObjectLabel(String sobjeApi)
{
   String finalString  = Schema.getGlobalDescribe().get(sobjeApi).getDescribe().getLabel();
   if(finalString  != null && finalString  !='')
       return finalString  ;
   else
        return sobjeApi;
}
}
Style:
.THIS table.imagetable{
    font-family: verdana,arial,sans-serif;
 font-size:11px;
 color:#333333;
 border-width: 1px;
 border-color: #999999;
 border-collapse: collapse;
}
.THIS th.thcls {
    background:#b5cfd2 ;
 border-width: 1px;
 padding: 8px;
 border-style: solid;
 border-color: #999999;
}
.THIS td.tdcls {
    background:#dcddc0 ;
 border-width: 1px;
 padding: 8px;
 border-style: solid;
 border-color: #999999;
}
Now we can use this component in lightning Apps or lightning App builder.
<aura:application>
    <c:showrecentcreatedrecords maximum_noofrecordstofetch="6" objectapiname="Account">
</c:showrecentcreatedrecords></aura:application>
Here I am using it in lightning App. Here is the Lightning App preview. To preview go to App and click on preview in right hand side bar. There is one benefit that we can show more than 1000 items of single list on UI which just over come the limit of visualforce page.

Tuesday, 4 August 2015

Salesforce to Salesforce

When it comes to deal with migration/sharing of data within salesforce orgs then no need to worry about. Salesforce provides a native feature Salesforce to Salesforce in short "S2S". It can also be used to create this data sharing relationship. Lets take a example of two orgs org1 and org2 and we need to share Account and Opportunity Data within orgs then this can be done easily in below steps:

Step1. Enable Feature Salesforce to Salesforce in org1 and org2 both.
Note: Once it is enabled it will be not be disabled. Setup-> App Setup-> Salesforce to Salesforce
                                                    

Step2: Now create an Account and contact record with email id of contact person of org2

Step3: Now Setup a connection in Salesforce org1 and send invitation to org2. Note: if connection tab is not visible then please make it visible to current app.
Step4: An Email will be sent to email address provided on contact ask to insert in previous steps. Once we click on link of email body it will redirect us to login screen.

Step5: Enter credential of org2 it will be redirected on invitation acceptance screen.

Step6: Now Publish Account and Opportunity objects along with fields in org1.


Step7: Now Subscribe objects in org2 and keep field mapping with setting up auto accept.
Step8: Now we all set.

Once we create Account ( with Opportunity record) and then in list view of Account click on "Forward to Connection". Select Connection name and proceed further allowing to forward opportunity data. You will see in org2 same set of record will be created with same values filled in org1 (when fields are properly mapped).

Limitations: Lookup IDs are not available for publishing. You can enable S2S for those fields by creating a formula field and then publishing the formula field.